In this tutorial, we are going to use two great tools for building mobile apps, gotiggr.com and phonegap simulator. gotiggr.com is an essential development tool for UI development (even though the tool can be used to connect to data as well). But certain reasons that qualified the tool to only as a UI development as of now. First is that, free Domain Hosting Accounts (as tested on kodingen.com and 0fees.net) does not allow gotiggr.com's ajax 'GET' call. This means that when you test your gotiggr.com app even with tested REST Service, you still get an error message. The error described as 'Access-Control-Allow-Origin' which can only be set at the Apache server's config file. A file which is not accessible if you are a user of Domain Hosting Sites (unless if you're a Premium user and granted the inclusion gotiggr.com for its Access-Control-Allow-Origin entry or you have maintained your own online web server). Second, you will be required to go online if you would need to access a web resource. Which means that your local LAMP or LAPP stack can't be accessed during the development. While this kind of connection is desired during testing, it would be a burden during development primarily when the internet connection is down for some reasons and the delay of fetching the web resource is sometimes intolerable. So, gotiggr.com will suffice (as of now) as UI design tool.
On the other hand, the phonegap simulator will finish what the gotiggr.com has started -- giving life to the UI. The good news is that phonegap simulator can read the file from gotiggr.com and we can configure some files or code with it to connect to the local LAPP or LAMP stack.The phonegap simulator will also save us from "starvation" when starting the app. A thing that most of us will experience when running Android apps using Eclipse environment configured to execute phonegap apps (you may never experience this if you got the "nice" hardware spec).
Getting Ready
So, let start. If you have not done so already, create an account at gotigger.com. Unfortunately, I am not going to discuss on some how to's for that site you can explore it yourself. Then Download the Phonegap Simulator. You must also configure you LAMP or LAPP stack in your local machine. If you're into CGI programming, you must also configure your CGI server.
The Application
For this example, the application is so simple. It will just accept a name from an input box and display it on another text box (i.e., if input is Juan, then the output will be Hello Juan). The output will be requested from a web server.
Things to do
1. Design the UI at gotiggr.com a sample, Figure 1 is provided as the model UI (See the red outline labelled 1).

Figure 1. Sample UI.
2. After the design, export the source code by clicking on the Export (you should export it as a Phonegap project) button (see Figure 1 red outline labelled 2). All the necessary codes will be downloaded as a zipped file.
3. Extract the zipped file in your PC and we're moving on to Phase 2.
4. There are plenty of folders and files found in the extracted folder, but we only need to focus our attention to two files, they are located in the [zipfilename]/assets/www. The two files are the .html and .js, they are usually named as screen-[some number].html and screen-[some number].js. See Figure 2.

Figure 2. Contents of [zipfilename]/assets/www
5. Open the two files using your favorite editor. First, examine the html document and take note of the id's of the html elements. Let us first take note of the two text box id's, one of these text boxes will serve as the input and the other one is the output. For the sake of this example, the upper text box will be the input and the lower text box for the output. As seen in Figure 3, the id of the input box is j_4 and the id of the output box is j_6. These ids are automatically generated by gotigger.com.

Figure 3. Code fragment of screen-[some number].html
6. The screen-[some number].js will be modified to let our mobile app connect to a server and request some resource. Refer to Figure 4 for the additional code.

Figure 4. Function to request a resource from a server.
There are things to take note of req() function. The first thing is that the declaration of the variable name_ is followed by an assignment statement to get the value of the input text box which has the id j_4. Then, it was followed by the connection definition. At the url part, you can change orven.kodingen.com to localhost which represents your local LAPP or LAMP stack. name.php is the name of the resource we are requesting written in (as the name suggests) PHP. The data part is the parameter passed onto the PHP file, and the success part is where we write some callback function. A function which will be executed if the query is successful. Inside the onSuccess function is a one liner code to set output text box with id j_6 using the html attribute. Go back to screen-[some number].html look for the button element and write onclick='req();' to execute the function req() when the button is clicked. After saving all the changes to the two files it's time to start the Phonegap Simulator.
7. The simulator only needs to open the html file as all the necessary files will be loaded by the simulator automatically. On the Debug Panel, click on the open button (red box in Figure 5) to open the html file, you only need to click the play button (orange box in Figure 5) if you have made changes to your files.
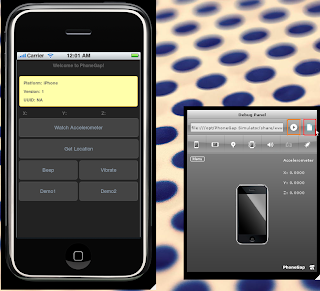
Figure 5. The Phonegap simulator.
8. Once the html file is loaded, it is time to interact with it. Write a name in the textbox and click the button. A sample interaction is shown in Figure 6.

Figure 6. A sample app interaction.
For the curious, the content of the name.php file is:

Hope this helps.
Source code is available here
Fin.
No comments:
Post a Comment