Thursday, July 3, 2014

Activating SMS Feature in my.Eskwela

my.Eskwela's concept is to be with you wherever you are and at any time. Though you can access my.Eskwela in your mobile phone through the mobile web browser (updated versions are recommended), a SMS utility is available for you just in case you  ran out load for accessing the web or you have no WiFi device to connect or simply, your mobile phone is only a feature phone (can only call, text, FM, and "flashlight").

Welcome to my.Eskwela SMS utility. With this, you can access your class card using SMS keyword. But first, you have to activate your my.Eskwela account before you can use this utility.

To start:
1. Verify your cellphone number.
           This is the first step and this is only done once. If successful, your cellphone number
           and your account are binded. To verify your cellphone number, send:

           MY.ESKWELA<SPACE><ID. NO><SPACE><my.Eskwela password>

           example:

           MY.ESKWELA  2013-1234  letmein

          you would then receive "SMS ACCOUNT CREATED" from  my.Eskwela if it was able to
          verify you.

Now that you have activated your my.Eskwela SMS account, you use any of these keywords interchangeably.


2. Make your presence known.
          If your instructor is already done with the roll call of attendance or you are late, you can
          actually make your presence known to your instructor's attendance list by sending a
          message with the format:

          ATTEND<SPACE><Course No.>

          example:        

          ATTEND ENG 1

           you would then receive a "Please wait for your instructor to confirm the attendance."
           message.  Your attendance have to be confirmed, but the good thing here is that the time
          of your arrival at the room is recorded.

3. Class Card SMS format
          To retrieve the class card for you to know the class standing, periodic grade (prelim,
          midterm, finals) and the number of times you've been absent in the class, just send a
          message following the format:

           CCARD<SPACE><Course No.>

           example:

           CCARD ACCTG 1

          sample my.Eskwela's reply would be:

          2014-1234
          DELA CRUZ, JUAN B.
          BSCS-1
          *-----
          Attended 50 of 55 sessions.
          *-----
          PRELIM: 1.00
          MIDTERM: 1.00
          FINALS: 1.00
          GRADE: 1.00
          *-----

          Consult the faculty for clarifications.

All your inquiries should be sent to this number:
             
For inquiries regarding this feature, you can email to:

           my.eskwela.iit@gmail.com

Thursday, June 26, 2014

Activating Students Account in my.Eskwela

Activating your my.Eskwela account is easy, just follow these easy steps.

Step 1. Click my.Eskwela .
If you accessed this site for the first time, your browser might warn that you are entering unverified site and all the associated warning messages. All you need to do is just click proceed or confirm security exception. This event will occur because my.Eskwela  uses self-generated security certificate for encrypting communication from your browser to the server. However, if you want to verify that you are in fact accessing  my.Eskwela. Please click on the self-explanatory images to guide obtaining the digital signature of  my.Eskwela. If the signature indicated in the pictures is the same as yours, then you are in fact accessing  my.Eskwela.
Figure 1. Chrome Browser

Figure 2. Firefox Browser

Step 2. Click on the Student Link, followed by clicking the Activate Now button (see Figure 3).
Figure 3.  my.Eskwela screen for students.
After clicking the Activate Now button, the verification dialog should appear (See Figure 4).

Figure 4. Verification Dialog for students.

 Step 3. Fill-up the required fields and click "Verify and Create Account" button. 

Once done, you will be re-directed to your main page with current load subjects displayed. Clicking on the button for any subject will guide you to see your Report Card. Enjoy!

(NOTE: If you think the Birthdate provided is correct and the system still insist that it is wrong. Please go to the Registrar's Office and request them to encode your Birthdate. Once done, repeat steps 1 - 3 and you be able to successfully activate your account.)

Don't forget to like us on Facebook.

Fin.

Monday, January 20, 2014

Working Offline in my.Eskwela for Faculty Members

Introduction
One of the features of my.Eskwela is that, it does not force you to use it's pre-made interface for encoding grades. But instead, it tries to adopt the way you encode your grades in your favorite spreadsheet program.

Throughout this article, I will be referring to either MS Office Excel or LibreOffice Spreadsheet as your favorite spreadsheet program.

(NOTE: This article assumes that you have the latest version of LibreOffice installed in your computer(PC) and for MS Office Excel the version 2007  is assumed.)

The Cycle
The figure below visually illustrates the flowchart for working with my.Eskwela offline records. The module that allows you to work offline with my.Eskwela is only the Desktop Module. And you can access it using your favorite browser on your Desktop Computer. You can access the Website here.

Briefly, the figure tells us that we need to log in to our my.Eskwela account and access the class record we want to work with later in offline mode, save the class record as a CSV (Comma-Separated Values) file. Open the class record (.csv) file using your favorite spreadsheet program, temporarily save it as xls or odp file, work with it (enter scores, don't forget to save) and convert it back to CSV then upload back to my.Eskwela.

And let my.Eskwela do the magic for computing the grades and presenting it visually to your students.


Figure 1. Working Offline


The Details


Part 1. Downloading the class record and Saving it as a Spreadsheet file.

The brief discussion is easier said than done. Here are the details on how you can get it working. First things first, log in to your account. For those who do not know yet, you will need to provide the username and password in e.SMS desktop application (the one that you use during enrollment, remember?). Once logged in, the teaching loads assigned to you will be displayed on the dashboard. Each load has a corresponding (arrow, '>') button that will allow you to do two things: 
  1. Attendance Recording (button labeled 'A')
  2. Class Recording (button labeled 'C')

Just like the one depicted in Figure 2. 

Figure 2. Load Entry and with the arrow button expanded. 
Available operations are also shown.

To get the class record, you need to click 'G' and you will be presented with the Manage Grade interface shown in Figure 3. Student's ID Number and name are blocked for privacy reasons.

Figure 3. Manage Grade Interface for Working with Class Record.

The interface in Figure 3 is a rich interface that will allow you work with your class record in online and provided mechanism for you to work in offline mode. Working with it online was already discussed during the training. This interface is brought up in this discussion because this is the only interface that will allow you to download the CSV file and upload the CSV file containing the class record entries. Figure 3 will display the basic details of all the students enrolled in your subject with the periodic grades and the projected grade. The projected grade is in color green because you can click it to view the details of the student's class record entry.

To start working offline, you have to download the CSV file by clicking the button with the .csv label. Once clicked another view in tab/window will appear in your browser. This view is your CSV file and you need to right click on it and click the "Save As.." option in the pop-up menu that will appear (see Figure 4) and make sure that you save the file with the .csv extention (see Figure 5).
(Note: If download message is Cancelled in Chrome, you have to update your browser.)


Figure 4. Screenshot for saving the CSV file in the PC.


Figure 5. Save the file with the extension .csv
                     

Now that you saved the file into your computer (PC), you can use your favorite spreadsheet program to open it and save it as a file in spreadsheet format (.xls or .odp). Once saved, you can now start encoding your entries. (NOTE:For those using LibreOffice just click OK for each message box that will appear.)

Part 2. Editing and Record Entries.

Now that you have the formatted file saved into your computer (PC), it is time to add entries into it. Please take note that, the contents of the file has already been re-formatted so that the my.Eskwela program can interpret it and make the appropriate actions. So, please do not change any entries that were part of the downloaded file. You start entering your entries at cell C5, you may need to adjust first the length of the cell in column B because in MS Excel 2007 auto-alignment is  not applied unlike in LibreOffice (See Figure 6 and 7.).

Figure 6. Auto-alignment of cell entries in LibreOffice.

Figure 7. No auto-alignment of cell entries in MS Excel 2007.

Once you are comfortable with working the spreadsheet it is now time to add the entries. Rows 5 and 6 has a special meaning in my.Eskwela.

ROW 5. Dash-separated entry that contains the information for Entry's period (Prelim, Midterm Finals), category (Quizzes, assignments, etc..) and the entry name.  An example entry will look like this:

MP-P1

This means that the entry is for midterm period under the project category and the name is P1. You can put whatever entry name you like. So in general, the entries in row 5 will have the form:

PC-Ename

P stands for period and can have the following values:
                                  P                   Prelim
                                  M                  Midterm
                                  F                   Finals

C stands for category and can have the following values:
                                  Q                  Quizzes
                                  A                  Assignments
                                  M                  Major Exams
                                  P                   Project
                                  C                   Recitation
                                  S                   Research
                                  L                   Laboratory

And Ename is the entry name. 

ROW 6. Numeric value that represent the maximum score for that entry.

The following rows will be the score for each student. You do not have to entry the total and the equivalent rating, once the file is uploaded, let my.Eskwela do its job. A sample accomplished entry may look like in Figure 8.


Figure 8. Sample Entries.

Part 3. Converting Back to CSV.

After encoding all the entries into your spreadsheet file and you think it's now time to inform the students of their results, you have to upload the file contents back to my.Eskwela. To do that, you have to convert first your spreadsheet file back to CSV. You can do this by accessing the File --> Save As... command of your favourite spreadsheet program. In LibreOffice it is quite straightforward but in Microsoft Excel 2007 you have to click on Other Formats option (see Figure 9.).

Figure 9. Save As option in MS Excel 2007.


After clicking the Save As option, you will be prompted by the Save As window. You will have to click the Save As type combo box and look for .csv entry (see Figure 10 and 11). Once selected, make sure that the .csv extension is automatically appended at the end of the file name. If not, type .csv at the end of the file name. Then click the Save button. If there are windows asking for confirmation, just click Save in this format and if there are more windows just click OK. And you're done for the conversion.

 Figure 10. Save As window in LibreOffice.

Figure 11. Save As window in MS Excel.


Part 4. Uploading back to my.Eskwela

Uploading the CSV file back to my.Eskwela is very simple, you just have to activate the Manage Grade interface (see Figure 3). And click the Choose File button. With file browser window open select the appropriate CSV file you want to upload. After selecting, your Web Browser may gray out, emphasizing the upload window (see Figure 12). This window will display in percentage the status of the file upload. The response time is dependent on the following factors: class size, number of entries and network connection. It may take some time for the status to move forward. Once the upload is done, the percentage will reach to 100% and a green Done button will appear (See Figure 13).

Figure 12. Showing the upload status.
Figure 13. Upload is done.

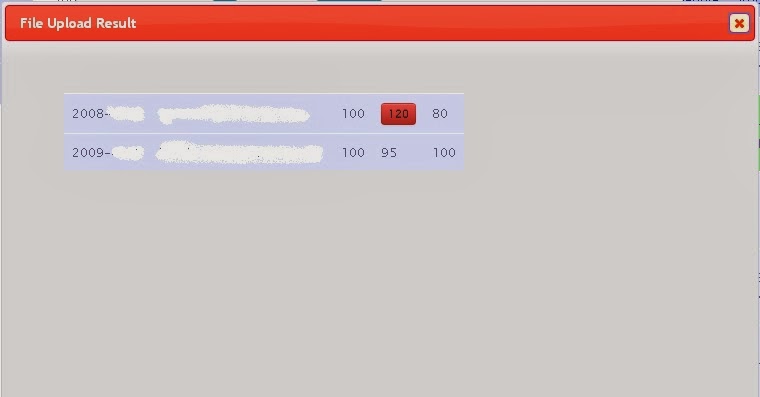
The green Done button will allow you to review the upload status of each entry. To view that status click the Done button and you will be re-directed to another Window called the file upload result. If all the entries are successfully uploaded, you will notice that each entry has no special attribute (see Figure 14). 

Figure 14. File upload result with no errors.

However, typographical errors happens and there might be entries that my.Eskwela program don't understand, so some entries might have some special attributes. This special attribute is represented by a red button labelled with your entry (see Figure 15.)

Figure 15. File upload result with errors.

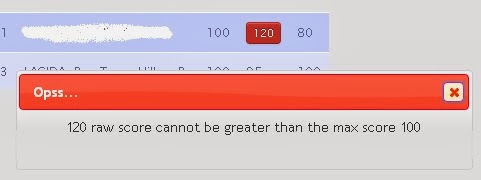
To understand why my.Eskwela does not accept that entry click on that red button and wait for some message to be displayed like in Figure 16.

Figure 16. Sample error message for some entries.

You'll have to look at that entry into your spreadsheet file and repeat Part 3 and Part 4. Or, you may choose to edit that entry in the my.Eskwela's pre-made interface.


Part 5. Fin.
NOTE: If you are having a hard time doing the things described here in this article please send your spreadsheet file to my.eskwela.iit@gmail.com.We will upload the file for you.

Wednesday, August 8, 2012

Collaboration using github

Steps to collaborate an existing project in githhub.

1. Create your account at github.com
2. Give your username to the author of the project.
3. Confirm that you have been added as collaborator in the project.
4. Create your own local git repository.
5. In the local repository, issue the command:

git remote add origin https://github.com//project_name

For example:

git remote add origin https://github.com/breezyrush/my.Eskwela
This will add a reference to a remote repository in github for the project my.Eskwela owned by breezyrush
6. To get all the files already in the remote repository, issue the command:

git pull origin master

This command will copy all the files already in the remote repository to your local repository.
7. After copying you are now free to look at the files change it or add a new file. The thing is -- every changes should be committed to your local repository. After you have done the changes and tested the code yourself and is now ready to share the changes to the collaborator, it's now time to issue the command:

git push origin master

That's it. Now to get updated of other collaborator's changes, you may want to pull from time to time for you to have an updated version in your local repository. Fin.

Tuesday, June 26, 2012

SHell saved the day!

I was having trouble letting my students start the processing IDE in our somewhat "super lag" computer lab. All options failed. Then I came to realization that I have to do the dirty job myself. This would include the following task applied repeatedly to student's individual directory:
  1. Accessing the student direcotry
  2. Access the Directory where I put the "zipped" IDE
  3. Extract the File
  4. And proceed to the next student directory.
This could go on forever should I choose to manually do the tasks one folder at a time. Then "light bulb", why not automate those tasks using a shell script. So after googling for some shell commands and syntax I finally arrived to the code below:
#!/bin/sh
#This is a simple shell script program to traverse all the directories containing
#the file  processing-1.5.1-linux.tgz stored inside csc 100 directory
#Programmed by: Orven E. Llantos

for file in *
do
 if test -d $file
 then cd $file;cd csc\ 100/; tar zxvf processing-1.5.1-linux.tgz; cd ../..;
 fi
done
The for-loop will access all the files in the current directory, then the if statement tests whether the current item is a directory, if it is then do the associated tasks otherwise do nothing. And done. Running this script saved me, to generalize the code above for it to do whatever you wanted to do repeatedly given a set of directories we can re-write it as:
#!/bin/sh
#This is a simple shell script program to traverse all the directories containing
#the file  processing-1.5.1-linux.tgz stored inside csc 100 directory
#Programmed by: Orven E. Llantos

for file in *
do
 if test -d $file
 then ;
 fi
done
Hope this could help you too. Fin.

Monday, June 18, 2012

what to do when you see this? --> /boot is using 87.7% of 227MB

When I remotely logged in to a server I maintained, I was alarmed by this message:

    /boot is using 87.7% of 227MB

It's kind of "something" that you'll get yourself to worry because it may have some adverse effect into your server. So then, I googled and found out some potential solutions, the best one I found here. From the previous threads I read, this problem usually occurs when after you updated your server's kernel you still keep the old versions. And if you repeatedly do this, you will eventually run out of space in /boot.

The key idea is, after you install a new kernel you have to remove the old one. But you only do this after you have tested the new kernel  and everything works fine with it.

So, here are the things you need to do in removing the old kernels using a command line. (Synaptic has alternative of doing this via GUI)

Step 1. Paste this code into your .bashrc file.
rmkernel () {
        local cur_kernel=$(uname -r|sed 's/-*[a-z]//g'|sed 's/-386//g')
        local kernel_pkg="linux-(image|headers|ubuntu-modules|restricted-modules)"
        local meta_pkg="${kernel_pkg}-(generic|i386|server|common|rt|xen|ec2)"
        sudo aptitude purge $(dpkg -l | egrep $kernel_pkg | egrep -v "${cur_kernel}|${meta_pkg}" | awk '{print $2}')
}

Step 2. Run source .bashrc
Step 3. Then rmkernel 

After Step 3, you will be prompted to enter the admin password and it will list the kernels installed in your system, mine looks like this: 
The following packages will be REMOVED:  
  linux-headers-3.0.0-14{pu} linux-headers-3.0.0-14-server{pu} linux-headers-3.0.0-15{pu} linux-headers-3.0.0-15-server{pu} 
  linux-headers-3.0.0-16{pu} linux-headers-3.0.0-16-server{pu} linux-headers-3.0.0-17{pu} linux-headers-3.0.0-17-server{pu} 
  linux-headers-3.0.0-19{pu} linux-headers-3.0.0-19-server{pu} linux-headers-3.2.0-24{pu} linux-headers-3.2.0-24-generic{pu} 
  linux-image-2.6.38-11-server{p} linux-image-2.6.38-12-server{p} linux-image-2.6.38-13-server{p} linux-image-2.6.38-8-server{p} 
  linux-image-3.0.0-14-server{p} linux-image-3.0.0-15-server{p} linux-image-3.0.0-16-server{p} linux-image-3.0.0-17-server{p} 
  linux-image-3.0.0-19-server{p} linux-image-3.2.0-24-generic{p} 
0 packages upgraded, 0 newly installed, 22 to remove and 43 not upgraded.
Need to get 0 B of archives. After unpacking 1,617 MB will be freed.
Do you want to continue? [Y/n/?] y

After you answered "y"es, more messages to appear on the screen and after that, you will only be left with one kernel in you /boot. To verify, you can issue this command:  ls -alt /boot/initrd.img* . You should only see one listing, and that is your current kernel.

Fin.

Tuesday, August 16, 2011

tiggr + phonegap

INTRODUCTION

In this tutorial, we are going to use two great tools for building mobile apps, gotiggr.com and phonegap simulator. gotiggr.com is an essential development tool for UI development (even though the tool can be used to connect to data as well). But certain reasons that qualified the tool to only as a UI development as of now. First is that, free Domain Hosting Accounts (as tested on kodingen.com and 0fees.net) does not allow gotiggr.com's ajax 'GET' call. This means that when you test your gotiggr.com app even with tested REST Service, you still get an error message. The error described as 'Access-Control-Allow-Origin' which can only be set at the Apache server's config file. A file which is not accessible if you are a user of Domain Hosting Sites (unless if you're a Premium user and granted the inclusion gotiggr.com for its Access-Control-Allow-Origin entry or you have maintained your own online web server). Second, you will be required to go online if you would need to access a web resource. Which means that your local LAMP or LAPP stack can't be accessed during the development. While this kind of connection is desired during testing, it would be a burden during development primarily when the internet connection is down for some reasons and the delay of fetching the web resource is sometimes intolerable. So, gotiggr.com will suffice (as of now) as UI design tool.

On the other hand, the phonegap simulator will finish what the gotiggr.com has started -- giving life to the UI. The good news is that phonegap simulator can read the file from gotiggr.com and we can configure some files or code with it to connect to the local LAPP or LAMP stack.The phonegap simulator will also save us from "starvation" when starting the app. A thing that most of us will experience when running Android apps using Eclipse environment configured to execute phonegap apps (you may never experience this if you got the "nice" hardware spec).

Getting Ready

So, let start. If you have not done so already, create an account at gotigger.com. Unfortunately, I am not going to discuss on some how to's for that site you can explore it yourself. Then Download the Phonegap Simulator. You must also configure you LAMP or LAPP stack in your local machine. If you're into CGI programming, you must also configure your CGI server.

The Application

For this example, the application is so simple. It will just accept a name from an input box and display it on another text box (i.e., if input is Juan, then the output will be Hello Juan). The output will be requested from a web server.

Things to do

1. Design the UI at gotiggr.com a sample, Figure 1 is provided as the model UI (See the red outline labelled 1).


Figure 1. Sample UI.

2. After the design, export the source code by clicking on the Export (you should export it as a Phonegap project) button (see Figure 1 red outline labelled 2). All the necessary codes will be downloaded as a zipped file.

3. Extract the zipped file in your PC and we're moving on to Phase 2.
4. There are plenty of folders and files found in the extracted folder, but we only need to focus our attention to two files, they are located in the [zipfilename]/assets/www. The two files are the .html and .js, they are usually named as screen-[some number].html and screen-[some number].js. See Figure 2.


Figure 2. Contents of [zipfilename]/assets/www

5. Open the two files using your favorite editor. First, examine the html document and take note of the id's of the html elements. Let us first take note of the two text box id's, one of these text boxes will serve as the input and the other one is the output. For the sake of this example, the upper text box will be the input and the lower text box for the output. As seen in Figure 3, the id of the input box is j_4 and the id of the output box is j_6. These ids are automatically generated by gotigger.com.


Figure 3. Code fragment of screen-[some number].html


6. The screen-[some number].js will be modified to let our mobile app connect to a server and request some resource. Refer to Figure 4 for the additional code.


Figure 4. Function to request a resource from a server.


There are things to take note of req() function. The first thing is that the declaration of the variable name_ is followed by an assignment statement to get the value of the input text box which has the id j_4. Then, it was followed by the connection definition. At the url part, you can change orven.kodingen.com to localhost which represents your local LAPP or LAMP stack. name.php is the name of the resource we are requesting written in (as the name suggests) PHP. The data part is the parameter passed onto the PHP file, and the success part is where we write some callback function. A function which will be executed if the query is successful. Inside the onSuccess function is a one liner code to set output text box with id j_6 using the html attribute. Go back to screen-[some number].html look for the button element and write onclick='req();' to execute the function req() when the button is clicked. After saving all the changes to the two files it's time to start the Phonegap Simulator.

7. The simulator only needs to open the html file as all the necessary files will be loaded by the simulator automatically. On the Debug Panel, click on the open button (red box in Figure 5) to open the html file, you only need to click the play button (orange box in Figure 5) if you have made changes to your files.


Figure 5. The Phonegap simulator.

8. Once the html file is loaded, it is time to interact with it. Write a name in the textbox and click the button. A sample interaction is shown in Figure 6.


Figure 6. A sample app interaction.

For the curious, the content of the name.php file is:


Hope this helps.

Source code is available here

Fin.