Monday, November 17, 2008

XAMPP on Linux

Linux has the best tools for LAMP (Linux, Apache, MySQL, PHP) servers, what you need to do is to get your hands "dirty" to set up these different beautiful tools to work as one. However, if you are just a developer and is used with "bundled" LAMP server where everything is set-up automatically, you would find getting your hands "dirty" is not your choice especially if there are many projects waiting to be done. Perhaps one of the famous "bundled" LAMP is XAMPP from Apache friends. In Windows, XAMPP is easily installed, just a matter of clicking the mouse as many times until the set-up is done. Starting the lamp server is quite easy and everything from that point will run smoothly (at least for the servers). The question is, can we have this done in a Linux system? The answer is YES! And perhaps many web developers just didn't realized that the comfort they experienced in Windows could also be experienced in Linux. Easy for me to say? Well, it is easy for you to do. In fact, this blog is about on dealing XAMPP for Linux. Here we go.

First things first, download the latest version of XAMPP for Linux here. For installation instructions you can read it here. Or you can simply follow the steps below, which is a slightly different version from the one found in the site:

1. Go to the directory where you downloaded the installer. For example, if it is downloaded in your Desktop the location would be /home/yourLinuxLoginName/Desktop. So, what you have to do is to start a terminal and issue a cd command to the path of the installer (i.e., cd /home/yourLinuxLoginName/Desktop).

2. Issue the command

sudo tar xvfz xampp-linux-1.6.8a.tar.gz -C /opt

The effect of this command is it will extract all the contents of the tar file to the directory /opt directory. The sudo will make the command a super user command. This is necessary because the user that has a write access to the opt directory is only the super user. In Ubuntu, the first account created during the installation is automatically added in the sudoers file. But this is not the case with Fedora, to add a user in the sudoers file follow this link.

3. Starting XAMPP is quite easy, you just have to issue the command:

sudo /opt/lampp/lampp start

Stopping is quite easy as well, just replace the start with stop.

4. Now that you have everything set-up what's next? You can now start accessing the XAMPP page by opening a browser and typing the address localhost in the address bar. If everything worked out correctly, you would see similar screen below:


5. The default XAMPP web site files are found in /opt/lampp/htdocs/xampp. You need to modify this directory so you can start working on your web sites. Some of you might want to delete the xampp web site and replace it with your own. But this tutorial will preserve that directory.
In order to have full access to the directory, issue the command:

For GNOME:
sudo nautilus /opt/lampp/htdocs/xampp

For KDE:
sudo konqueror /opt/lampp/htdocs/xampp

For XFCE:
sudo thunar /opt/lampp/htdocs/xampp

This command will open the directory in GUI mode. (Remember that only super user has all access to the /opt directory, hence we included sudo in our command.) Initially you'll see this kind of information window:


Since we need to preserve the XAMPP web site files we need to create a container for these files -- we have to create a directory and we can call it xampp-install. So, right-click the opened directory and click Create Directory and type the name xampp-install.


Transfer all the files into xampp-install directory, after doing that what will be left is only the directory we created.


This will also change the display of your browser, if it is already opened click reload or refresh and you'll see a similar window below:


Clicking on the link will let you browse again the previous website contents only with minor difference. But don't worry everything else is alright.

To add a website of your own, create a directory for that site. Say, we want to create a folder named myfirstweb. And then, put all your web site files in this directory. If you are going to refresh the browser you would see:


The directory we created appears as a link in the site. To view the site click on the link. In my example I created a simple page to display "Hello World".


Fin.

Sunday, November 16, 2008

Dealing with RAR files

Fedora or Ubuntu can handle many compressed file formats. By default, it can handle tar.bz2, tat.gz, .zip etc but it cannot handle .rar files. So, uncompressing such file in both systems cannot work. Fortunately, both these Linux distros support unrar program. This program will allow the possibility of accessing rar files in your Linux Box. To install, do:

For Fedora:
sudo yum install unrar
For Ubuntu:
sudo apt-get install unrar

After doing so, you can right-click any rar files and choose to "Extract Here", "Extract To", or "Open with Archive Manager".

Fin.

Monday, November 10, 2008

postgreSQL setup Fedora

Fedora has different ways of approaching things. And one of them is the setting up of postgreSQL database. Unlike in Ubuntu, Fedora requires the database administrator to set up things the way it expected them to be. The steps one might follow are:

1. Decide the location of the database directory,
2. Initialize the database using this connection,
3. Modify /etc/profile file, to start the database without requiring the -D option,
4. Modify pg_hba.conf
5. Start the database manually using pg_ctl.
6. Change postgres password.
7. Securing connections.
8. Start the database automatically.

Decide the location of the database setup

This is a file or directory organization issue, you can put the postgreSQL database anywhere you like as long as it does not require super user previlege and that you have access too. But for simplicity, let us assume that you wanted to put the database in the directory mypgdb in your local directory. So, if your linux user name is dbadmin, you might want to put the directory in /home/dbadmin/mypgdb. And since this directory is not created by default, open a terminal and in your home directory type:

mkdir mypgdb

Initialize the database using this connection
After creating the directory, in the terminal still, type:

initdb -D /home/dbadmin/mypgdb

This command will prepare the directory mypgdb for use by postgre.

Modify /etc/profile file, to start the database without requiring the -D option

You can now start the database by typing:
pg_ctl -D /home/dbadmin/mypgdb start -o -i

This command will start the database and will accept connections.
The database service could be started without the -D option, how? By exporting and setting the PGDATA variable. Everytime this variable is set you can to start the database without including the -D option. Neat! But that would include 2 commands now, setting and exporting the PGDATA and starting the database.
To automatically set the PGDATA, we must add an entry to the /etc/profile. Using your favorite editor, say vim, type the command:

vim /etc/profile

Add a new entry at the end of the file like this:

export PGDATA=/home/dbadmin/mypgdb

After that, save your work and re-login from the Fedora system for the changes to take effect.

Modify pg_hba.conf

The pg_hba.conf file determines how users are authenticated in the database system. There are many types of possible authentication but for this discussion let us try to focus on trust and md5, for more information about the pg_hba.conf click here.
Briefly described, the trust type will allow any registered users of the database system to login without requiring a password. This type of authentication is good for the initial set-up specifically on changing the password of the default user postgres. While md5 is the recommended type when you are allowing login request from remote users. This option will ask for the user to enter its corresponding password and more. The password is encrypted as it is passed from the remote computer to your database system. So, information thieves will have a hard time cracking your password if ever they intercepted it. Nice, isn't it?
To change the default password of the user postgres, Follow these steps,
1. Stop the database.
pg_ctl stop
2.Change the authentication entry in the pg_hba.conf file, from md5 --> trust. You can find the pg_hba.conf in the database directory that you specified (i.e., /home/dbadmin/mypgdb).
3. Start the database.
pg_ctl start -o -i
4. Then you can read from my previous blog on how to do it using pgAdmin3 (specifically steps f - h). If you haven't installed it yet type:
sudo yum install pgadmin3 -y

Securing connections.

Now that you are in control of the postgres account the next thing you need to do is to make sure that subsequent connections be authenticated. So, we need to access the pg_hba.conf file and change the previously trust to md5.

Then, stop and start the database.

Start the database automatically.

Unlike in Ubuntu, the postgreSQL database does not automatically start. If you want this to happen, you have to put an entry in the Sessions containing the command to start the database. To do this, go to System --> Preferences --> Personal --> Sessions, you would then be prompted by the interface shown below:


Click Add, and provide information similar to the ones you see in the following figure:


Click OK. And the next time you boot up, postgeSQL will automatically start.

Fin.

Friday, November 7, 2008

Making Code::Blocks work in a Linux Box


Linux C/C++ programmers do most of their programming work in the terminal. From editing files, compiling, testing and debugging. There are lots of good command line editors, I must say, complete with syntax highlighting and the features you would expect from an editor. With an additional capability to handle syntax highlighting for different programming languages. One that I like most is vim. But the use of the stuff is way "too advanced" for others and sometimes causes them to "panic" for the first programming tasks. If the user is used with the "nice" IDE of "other" operating system, it would think "Linux is not the right stuff for me."

But hey, think again, the thing that you like in that "other" operating system could also be found in Linux. And one program that could provide you with such a functionality is Code::Blocks. You can find more detail here.

To install codeblock, do this:


for Fedora:
sudo yum install codeblocks

for Ubuntu:
sudo apt-get install codeblocks

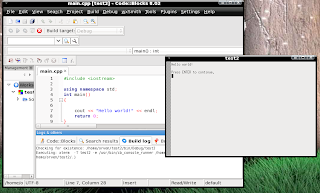
During the first run, it will automatically detect the installed compiler in your system (i.e.,GNU GCC Compiler). Then it will show you its interface, nice!

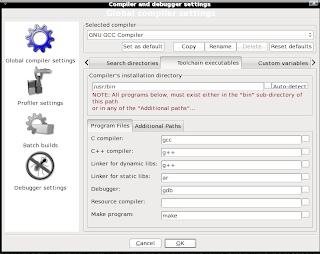
But when you compile your first program, it may seem odd that the IDE is issuing error messages. You then begin to wonder the occurrence of such a thing when all the necessary compiler are already installed. One thing to note is that, even though it detected the kind of compiler that you have during the first run, it still needs to know the locations of the compiler. This is necessary as some Linux systems has different C/C++ compiler directory structure. The way to solve the aforestated problem is to set-up the necessary info in order for the IDE to work. How? Follow these steps:

1. On the menu, go to Settings --> Compiler and Debugger. It will show you the window:


2. Find the tab, which has the label Toolchain executables.
3. In the textbox under the "Compiler's Installation Directory" type the location of your C/C++ compiler binary. If you don't know it, open a terminal and type:

whereis g++

this command will return the location of g++ compiler and its manual file. For example, in my Fedora 9 box it returns:

g++: /usr/bin/g++ /usr/share/man/man1/g++.1.gz

You only need to take note of this /usr/bin/g++. Because this means that g++ is located in /us/bin directory as well as the other compilers. And this is the information you need to provide to codeblocks. After typing this info, click the OK button.

The next time you compile in codeblocks it will now be able to run your C/C++ code (of course, provided that your program does not contain any error during compilation.)


Wednesday, November 5, 2008

Using pgAdmin III to set-up PostgreSQL default access

This tutorial is for those who want to use pgAdmin III in setting-up postgreSQL default access inside an Ubuntu 8.10. If you have not done so, install postgresql by typing in the terminal the following:

sudo apt-get install postgreql

then to install pgadmin III

sudo apt-get install pgadmin3


1. Changing postgres password.

The default authentication to the database is md5, in simplest term the database will require password for user authentication (see postgreSQL documentation for the meaning of md5 authentication). And the default user is postgres. Initially, we don't know the password of the user postgres and it is the only user defined within the database. To set up the password, do the following (steps a-d assumes you are working on a terminal):

a. cd /etc/postgresql/8.3/main
b. sudo vim pg_hba.conf #or any text editor you like
c. #inside the file change md5 --> trust
#the trust option allows any user (as long as it is in the database)
#to login without any password.
#then save your work

d. sudo /etc/init.d/postgresql-8.3 restart #this is necessary for the changes to take place
e. #start pgadmin3
f. #create a new connection

g. #login as postgres


#postgre can now login without the need for a password
h. #modify the postgres password by expanding the login roles, and by double-clicking
#the postgre icon. in the dialogue box, type the desired postgres password, then click ok.


And that's it, the password for the user postgre have changed.


2. Protecting the database.

To change, the original postgresql authentication setting. We have to do the following.

a. Close pgadminIII if it is still running.
b. Repeat steps a - d, only this time replace trust --> md5.


The next time you access the database, it will now be your password the system will be accepting.

Fin