Thursday, July 10, 2014

Linking my.eskwela and Facebook

Facebook nowadays is not anymore some kind of an app only for socializing. But it has also become a platform for developers to enjoy features that will boost app viral-ity and applicability to the intended community.

my.Eskwela is among those apps that integrate social networking sites to help users share school related badges. In my.Eskwela, badges refer to share-able items related to subject performance. One observer commented that, the feature is good to boost the morale of the learner when they share their accomplishments (or difficulties) to gain encouragements/suggestions/appreciations from the people who are members of their social network.

To enable sharing from my.Eskwela to Facebook, follow the steps outlined below:

1. Open  my.Eskwela in the Web Desktop and click the Social Media menu then Facebook Login button (see Figure 1). A  Facebook login dialog will be displayed like the one seen in Figure 2.

Figure 1.  Facebook Login Button

Figure 2. Facebook Login Dialog

2. Provide the  Facebook credentials (user name and password), then click on the Log In button. Wait for  Facebook to verify the credentials and when done,  my.Eskwela will try to look for an associated account with the current Facebook  account. If there is, then it is treated as successful  my.Eskwela login otherwise, an accounts not linked dialog will appear just like in Figure 3.

Figure 3. Accounts not linked dialog.

The dialog offers two options: existing users (green button) and not activated student accounts (orange button). The first option is for verification of existing  my.Eskwela users, clicking it will prompt the Login dialog. The latter button will only be applied to current students whose  my.Eskwela accounts are not yet activated. To activate, just follow the instructions here.

When the login credentials have been verified, Facebook will display the access rights as requested by my.Eskwela app for use in future operations. There are only two access rights my.Eskwela requests from the users, they are;

                                         1. Public Profile and Friends List (Figure 4)
                                         2. Posting (Figure 5)

 my.Eskwela  does not automatically post to Facebook the grades or any pertinent information related to student's performance, this is initiated by the user. The only automatic post  is the  my.Eskwela  First Badge (see Figure 6)! That tell friends of successful link between  my.Eskwela  and Facebook accounts. When the badge is clicked, it will automatically open a new browser window for my.Eskwela portal.


Figure 4. Public Profile and Friend's List

Figure 5. Posting


Figure 6. First Badge

Successful verification of my.Eskwela accounts and permission grants ensures the linkage of  my.Eskwela account and Facebook account. As already pointed out, the  Facebook credentials can then be used to login  my.Eskwela

How cool is that?

Fin.


(NOTE: This feature is only available in  my.Eskwela Desktop Web App.)

Wednesday, July 9, 2014

The Grading Module in my.Eskwela for Faculty Members

This module is responsible for recording student's performance on class activities like quizzes, assignments, major exams, and other items supported by my.Eskwela. It is also the responsibility of this module to compute the grades based on entries and distribution specified ahead of the faculty member for the class.

To activate this module,  the 'G' button must be clicked on the popup when the subject button is clicked in the dashboard (See Figure A).

Figure A. Popup button on a Subject Entry.

Once done, the Manage Grade dialog will appear (see Figure B). This dialog as with any other dialog contains information for the subject and buttons to represent actions that can be done. The functionality of these buttons will be discussed in the succeeding sections. One thing to take note of in this view, is the presence of class list along with associated colored buttons labeled by numbers. These numbers represent the accumulated results out from applying the distribution percentages as set up by the faculty members. Clicking on the individual buttons will open a dialog for the report card (See Figure C). 

Figure B. Manage Grade dialog.

The report card is the one seen by the students when they open their  my.Eskwela account. It is filled with visualization of pertinent information for them to easily keep track performance.

Figure C. Report Card

Encoding Grades
 my.Eskwela provided different ways of encoding grades: online and offline modes. Each of these methods will be discussed shortly.

To successfully enter student's grades, the faculty member has to follow the steps outlined below for every semester:

    1. Set Up Grade distribution.
    2. Set Up Transmutation Table (if necessary)
    3. Input Grades through
           i. Desktop Web
                   a. Online
                   b. Offline
           ii. Mobile Web

Set-Up Grade Distribution
To understand how  my.Eskwela compute the grades, a formula is presented in Figure 1.

Figure 1.  my.Eskwela's formula for computing the grade.

The result of this formula will then be mapped to the Transmutable Table for equivalence. One would then come to realization that, as implied  by Figure 1, grades will not be computed when the grade distribution is not fully set-up.  my.Eskwela has error-detecting capabilities to inform the users on missing pre-requisites while doing Grade Entry. For example, if faculty has incomplete distribution,  a message would appear on the Grade Entry dialog (see Figure 2), a complete distribution will sum to 100%.


Figure 2. Entry Record dialog with error messages. 

my.Eskwela provided a quick fix for error messages appearing on entry record and that is the availability of the Setup Grade Distribution button (see outlined Orange Button in Figure 2). Clicking on this button, makes the Grade Setup Dialog appear (see Figure 3).

Figure 3. Grade Setup Dialog.

The dialog in Figure 3 consists of course information and toggle-able boxes (Figure 3 labels as 1 and 2). 

Weight Distribution
The Weight Distribution toggle button is for item weight distribution like quizzes, etc. Clicking the Weight Distribution button toggles the input interface along with relevant information (see Figure 4).

Figure 4. Weight Distribution Dialog.

The input interface in Figure 4 consists of two input boxes and a table showing the categories with corresponding values. 

To input a category (see Figure 4 label 1), type the first two-three letters and an auto-complete box will appear below, clicking on the suggested word will save you from typing the whole word. Moreover, my.Eskwela has a predefined set of acceptable categories, to view all, press the space bar and the list will be displayed.

One will then proceed to typing the numeric value (see Figure 4 label 2) of the percentage for that category in the distribution (without the %). Pressing the enter key will cause the category and percentage be part of the weight distribution and will be reflected on the table below it.

In case of changes, click the DEL (see Figure 4 label 3) button first to remove that entry and do the previous steps for the new entry(ies).

Clicking on the Weight Distribution button will hide the input interface and the Grade Setup dialog will look like Figure 3 again.

(NOTE: The values encoded in this dialog is used by the Report Card for visualization, see Figure C.)

Period Distribution
The instructions to input period distribution is just the same from that of weight distribution, only this time one has to activate the input interface by simply clicking on Period Distribution toggle button (see Figure 3 label 2), the result is shown in Figure 5. 


Figure 5. Period Distribution Dialog.

Completing the setup distribution for both period and weight will result for an "All Clear" message in the Grade Entry dialog (see Figure 7 label 1).

Set-Up Transmutation Table

 my.Eskwela already has a predefined transmutation table and a passing rate of 50%. However, the passing rate and the transmutation table of all faculty members varied, so, a utility is provided for this purpose.

To personalize the transmutation table,  click the Transmutation Table button (see Figure B), and the Transmutation Table dialog will appear (see Figure 6).

Figure 6. Transmutation Table Dialog

The user must first set the passing rate by typing a number in the input box (see Figure 6 label 1),  by default zero, and click the Set! button (see Figure 6 label 2). On successful operation, the entries in the grid (See Figure 6 label 4) will reset to nothing. This means that it is now ready to be personalized with your desired entry. Entries for this table must be set to avoid future problems in computing student's grade displayed in their Report Cards (see Figure C). Keying in entries is just like what one do in Spreadsheet program (Microsoft Excel or LibreOffice Spreadsheets). After the entry, do not forget to save by clicking the Save button (see Figure 6 label 3).

Input Grades using Web Desktop (Online Mode)
To start encoding student's grade using the default interface, click the Grade Entry button (see Figure B color blue), figure 7 will then be loaded.

Figure 7. Entry Record Dialog.

To input the details of a single entry, click the Toggle Entry Setup button (see Figure 7 label 2). An input group will then be displayed (see Figure 8), clicking the same button will hide them.

Figure 8. Input Groups

These input groups associates an entry in the class record. The period, category, entry name, and max score should be filled so any entries will be associated with it.

Take note though, that after typing an Entry Name, this interface will automatically find any saved record related to the info. If there is, the Max Score and the entry list will automatically be filled. Otherwise, the Max Score field has to be filled up.

It is a good practice to toggle the group entries before a score entry is done to individual students for a compact view.

By default, the first student in the class list is the one displayed. To navigate student entries in the class list, use the up and down arrow keys making sure that the cursor is currently positioned at the score text box (see Figure 7 label 3). Typing a numeric value of the same text box followed by pressing the enter key will cause the  my.Eskwela  to record that score to the student and update the entry list below it (see Figure 9 label 2). 

 Figure 9. Entry List

To modify an entry, click EDIT (Figure 9 label 1) button and the score text box will be updated to the value of the encoded score along with the student information. Typing the corrected numeric value followed by the enter key will cause the entry to be modified and the entry list will be updated.

Input Grades Offline Mode
my.Eskwela  supports offline mode. To be able to understand how it can be achieved, click here.

Input Grades using Mobile Interface

While there are many available options to input grades in Desktop Web, there is only one option for the Mobile Web. To activate the grade input interface, in the Dashboard or in the My Class View, tap a subject and tap the Grade menu item (see Figure 9). Once done, another interface will be loaded that resembles the interface in Figure 8 but is rendered using mobile elements (See Figure 10).

 Figure 9. Current Load Listing.


Figure 10. Mobile Grade Entry Interface (expanded).

Figure 11. Mobile Grade Entry Interface (collapsed).

The input group is toggle-able using the Grade Entry Information button (see Figure 11 label 1). Each input element has an associated help button, a sample is outlined in Figure 10 label 1. Tapping on any of these buttons will cause it to display important message to describe the input element. The values in the drop boxes (Figure 10 labels 2 and 3), are dependent of the values encoded in Grade Setup (see Figure 3). The drop boxes will be empty if the Weight Distribution (Figure 4) and Period Distribution (Figure 5) are not yet encoded with required information. 

To start encoding a class record entry, select the appropriate values in the drop boxes (Figure 10 labels 2 and 3). Then type the entry name (Figure 10 label 4), if the entry name is already encoded click the Retrieve button (Figure 10 label 5). Proceed to typing the max score (Figure 10 label 6) and tap the Set button (Figure 10 label 7).  

When all the entry information has already been complied, tap the Grade Entry Information button (Figure 11 label 1) to hide the input elements (see Figure 11). Only one student can be displayed at any time, to browse through the class list choose from the possible options. First, browsing to the previous and next student can be done by tapping the previous (Figure 11 label 3) and next button (Figure 11 label 4). And second, if the browser supports, browsing to the previous and next student are done by swiping left and swiping right, respectively, in the picture area.

To input a score, activate the text area (Figure 11 label 3) and type the student score, once done, tap the OK button (Figure 11 label 6) and the entry will be saved. The next student in the class list will not be automatically loaded to make sure the faculty member can review the given score. Browse the next (or previous student) and continue encoding until the last student is reached. The last student is determined by the number found in Figure 11 label 7. If the number in the white box is just the same with the number in grayed box then the last student has been reached.

Fin.
The Attendance Module in my.Eskwela for Faculty Members (Using Desktop Web)

This module is responsible for encoding student's attendance to classes. It allows faculty members to see at one glance the total attendance with respect to student attendance. To activate the attendance monitor window, click on the button beside your class schedule and click the button labeled 'A' (see Figure 1).


 Figure 1. Subject Entry with Popup Tool.

Once done, the attendance monitor window will popup (see Figure 2).

Figure 2. Annotated Attendance Monitor Window

The Attendance Monitor Window.
This window will give the following information at first glance; subject details, paginated class list, total attendance made so far, students attendance count, and the details of the attendance.

Navigation
At any time, the number of date entries will grow and it may not be seen at one glance. To navigate on the date, entries drag the horizontal button (see Figure 2 label 5).  As you do this, you notice that only the dates are being scrolled were updated and some columns are frozen (see Figure 2 on box labelled "Frozen").

The class list displayed is paginated only to 10 students, to view to the other list click on any page number button(see Figure 2 label 4). The number of buttons displayed here is dependent on the class size, more buttons will be displayed if you have bigger class sizes. The button number colored blue is the current page displayed.

Attendance Buttons
The attendance buttons are objects that will inform the viewer the status of the student's attendance given a date. Green button means present, white button means absent, orange button is an unconfirmed attendance. This button also provide other feature to correct the attendance entry of a student. To alter the status of the attendance, just click the button and it will automatically alter the students attendance status. Here is the list of the attendance button's toggle behavior (see Figure 3):
Figure 3. Attendance Button Behavior and Color Meaning

Attendance Mode
There are three modes of facilitating attendance encoding to my.Eskwela, they are:

1. Roll Call
2. Encode
3. Add Date

Roll Call for Desktop Web
This is the traditional method of doing attendance -- Roll Call. To activate this feature in  my.Eskwela, click the "Roll Call" button (see Figure 2 label 3). It will then display a dialog depicted in Figure 4.
Figure 4. Annotated and Cut Version of the Roll Call Dialog in Desktop Web.

Dialog Overview
At first glance, the Roll Call Dialog gives the following information: Subject Details and Schedules, the status of the class (started/not started, see Figure 4 label 2), status of student (graduating/non-graduating, Figure 4 label 3), photo, and attendance status (orange "not recorded"/red "remove", Figure 4 label 4 ).

Before the Roll Call
Before anybody can start recording the attendance of students, they have to click first the "Start Class" button (Figure 4 label 1). Doing this action causes the button to toggle from "Start Class"(blue button) to "Stop Class" (red button), and the status in Figure 4 label 2 will change from "Not Started" (red background) to "Started" (green background).

Doing the Roll Call
To start recording the attendance, the record button has to be clicked. On successful operation, the "Record" (Orange Button, See Figure 4 label 4) will toggle to "Remove" (Red Button). Continually applying the process on present students.

After the Roll Call
When the Roll Call is done, the faculty member can opt to stop the class. This action will prevent any students from being recorded in the attendance list, including those that will attempt to be recognized as present in the class thru SMS (leaving the class as started accommodates them otherwise).

Encode
The encode mode applies to situation where the faculty members allows the student to encode the ID Number following a line on designated computer. This way, the faculty member will just have to wait for the whole class to finish encoding the ID number.  Encoding can mean swiping the ID Card to a bar code scanner (when available) but on the unavailability of this gadget, the input device to use is the keyboard. To activate this feature in  my.Eskwela, click the "Roll Call" button (see Figure 2 label 2). The dialog in Figure 5 will then be displayed.

Figure 5. Annotated Encode Dialog.

Dialog Overview
At the onset, the dialog displays the following information: subject information and schedule, status of class (see Figure 5 label 1), the number of present students (see Figure 5 label 4), and the list of present students (see Figure 5 label).

Facilitating the Encoding
Just like the Roll Call method, the faculty member should start first the class, This can be done by clicking the "Start Class" button (see Figure 5 label 1).Once the class has started, the students may now start to input their ID Number on the text box (see Figure 5 label 2), pressing the enter key will cause the system to display their photo (if available), Name and Course/Year, the number of attended session out from the total sessions (see Figure 5 label 3), the number of student present in the class (see Figure 5 label 4), and the modified listing that includes their name (see Figure 5 label 5).

Add Date

The add date mode is useful on times where Internet connection is not available and the artifact of attendance is written on paper together with the student's signature. This feature takes advantage on the fact that the Attendance Buttons are toggle-lable.

To input attendance, encode the attendance date on the text box, then click "OK" button (see Figure 2 label 1). Clicking the "OK" button causes the system to add a date in the grid with all attendance set to absent. To change this, just click on the button to toggle from absent to present thereby reflecting the presence of the students in the paper.


The Attendance Module  (Using Mobile Web)

my.Eskwela also has the attendance module using the mobile web. On mobile devices, my.Eskwela can be accessed on updated browsers on the same link used to access my.Eskwela in the Desktop Browser.

The mobile equivalence of the attendance module is just a subset of the feature available on Desktop Web. In fact, the only available option for mobile attendance is only Roll Call mode. To access this feature, tap on the subject that is scheduled to have a class today and two menu options will pop-up -- attendance and grade (See Figure 1 label 1).

 Figure 1. Annotated dashboard of the Mobile Web Version.

However, if the subject you want is not on today's list you can tap the "MY CLASS" button (See Figure 1 label 2). And you will be redirected to the view that lists all your subjects. Tapping each subject allows you to access the two menu options (Attendance and Grade). 

Doing Attendance
Tapping on the attendance menu option brings you the mobile version of the Roll Call window as depicted in Figure 2. Unlike in the Desktop Web equivalent, you will not see a list of students but only one student is displayed at a time.
Figure 2. Mobile Version of Roll Call Feature

Before recording, the class has to be started. It can be done by tapping the button on Figure 2 label 1. This button will will then toggle from "NOT STARTED" to "STARTED".

To record the attendance of the current student, the "NOT PRESENT" button (see Figure 2 label 5) should be tapped. The system will then record the attendance and will automatically proceed to the next student. Doing the same thing until the last student is reached. 

The current student number and the total amount of students in the class list can be seen on lower left portion of the view (See Figure 2 label 5). 

Browsing the Students
To move from one student to another, the faculty member has two options -- tapping and swiping.

Tapping
Left button and right button are the primary means of browsing student in the class list. The left button displays the previous student and the right button displays the next student with respect to the current student.

Swiping
When swiping is supported by the device, the faculty member can just swipe left or right on the picture area (see Figure 2 label 2) to browse the previous or the next student respectively, in the class list with respect to the current student.

Fin.

Thursday, July 3, 2014

Activating SMS Feature in my.Eskwela

my.Eskwela's concept is to be with you wherever you are and at any time. Though you can access my.Eskwela in your mobile phone through the mobile web browser (updated versions are recommended), a SMS utility is available for you just in case you  ran out load for accessing the web or you have no WiFi device to connect or simply, your mobile phone is only a feature phone (can only call, text, FM, and "flashlight").

Welcome to my.Eskwela SMS utility. With this, you can access your class card using SMS keyword. But first, you have to activate your my.Eskwela account before you can use this utility.

To start:
1. Verify your cellphone number.
           This is the first step and this is only done once. If successful, your cellphone number
           and your account are binded. To verify your cellphone number, send:

           MY.ESKWELA<SPACE><ID. NO><SPACE><my.Eskwela password>

           example:

           MY.ESKWELA  2013-1234  letmein

          you would then receive "SMS ACCOUNT CREATED" from  my.Eskwela if it was able to
          verify you.

Now that you have activated your my.Eskwela SMS account, you use any of these keywords interchangeably.


2. Make your presence known.
          If your instructor is already done with the roll call of attendance or you are late, you can
          actually make your presence known to your instructor's attendance list by sending a
          message with the format:

          ATTEND<SPACE><Course No.>

          example:        

          ATTEND ENG 1

           you would then receive a "Please wait for your instructor to confirm the attendance."
           message.  Your attendance have to be confirmed, but the good thing here is that the time
          of your arrival at the room is recorded.

3. Class Card SMS format
          To retrieve the class card for you to know the class standing, periodic grade (prelim,
          midterm, finals) and the number of times you've been absent in the class, just send a
          message following the format:

           CCARD<SPACE><Course No.>

           example:

           CCARD ACCTG 1

          sample my.Eskwela's reply would be:

          2014-1234
          DELA CRUZ, JUAN B.
          BSCS-1
          *-----
          Attended 50 of 55 sessions.
          *-----
          PRELIM: 1.00
          MIDTERM: 1.00
          FINALS: 1.00
          GRADE: 1.00
          *-----

          Consult the faculty for clarifications.

All your inquiries should be sent to this number:
             
For inquiries regarding this feature, you can email to:

           my.eskwela.iit@gmail.com

Thursday, June 26, 2014

Activating Students Account in my.Eskwela

Activating your my.Eskwela account is easy, just follow these easy steps.

Step 1. Click my.Eskwela .
If you accessed this site for the first time, your browser might warn that you are entering unverified site and all the associated warning messages. All you need to do is just click proceed or confirm security exception. This event will occur because my.Eskwela  uses self-generated security certificate for encrypting communication from your browser to the server. However, if you want to verify that you are in fact accessing  my.Eskwela. Please click on the self-explanatory images to guide obtaining the digital signature of  my.Eskwela. If the signature indicated in the pictures is the same as yours, then you are in fact accessing  my.Eskwela.
Figure 1. Chrome Browser

Figure 2. Firefox Browser

Step 2. Click on the Student Link, followed by clicking the Activate Now button (see Figure 3).
Figure 3.  my.Eskwela screen for students.
After clicking the Activate Now button, the verification dialog should appear (See Figure 4).

Figure 4. Verification Dialog for students.

 Step 3. Fill-up the required fields and click "Verify and Create Account" button. 

Once done, you will be re-directed to your main page with current load subjects displayed. Clicking on the button for any subject will guide you to see your Report Card. Enjoy!

(NOTE: If you think the Birthdate provided is correct and the system still insist that it is wrong. Please go to the Registrar's Office and request them to encode your Birthdate. Once done, repeat steps 1 - 3 and you be able to successfully activate your account.)

Don't forget to like us on Facebook.

Fin.

Monday, January 20, 2014

Working Offline in my.Eskwela for Faculty Members

Introduction
One of the features of my.Eskwela is that, it does not force you to use it's pre-made interface for encoding grades. But instead, it tries to adopt the way you encode your grades in your favorite spreadsheet program.

Throughout this article, I will be referring to either MS Office Excel or LibreOffice Spreadsheet as your favorite spreadsheet program.

(NOTE: This article assumes that you have the latest version of LibreOffice installed in your computer(PC) and for MS Office Excel the version 2007  is assumed.)

The Cycle
The figure below visually illustrates the flowchart for working with my.Eskwela offline records. The module that allows you to work offline with my.Eskwela is only the Desktop Module. And you can access it using your favorite browser on your Desktop Computer. You can access the Website here.

Briefly, the figure tells us that we need to log in to our my.Eskwela account and access the class record we want to work with later in offline mode, save the class record as a CSV (Comma-Separated Values) file. Open the class record (.csv) file using your favorite spreadsheet program, temporarily save it as xls or odp file, work with it (enter scores, don't forget to save) and convert it back to CSV then upload back to my.Eskwela.

And let my.Eskwela do the magic for computing the grades and presenting it visually to your students.


Figure 1. Working Offline


The Details


Part 1. Downloading the class record and Saving it as a Spreadsheet file.

The brief discussion is easier said than done. Here are the details on how you can get it working. First things first, log in to your account. For those who do not know yet, you will need to provide the username and password in e.SMS desktop application (the one that you use during enrollment, remember?). Once logged in, the teaching loads assigned to you will be displayed on the dashboard. Each load has a corresponding (arrow, '>') button that will allow you to do two things: 
  1. Attendance Recording (button labeled 'A')
  2. Class Recording (button labeled 'C')

Just like the one depicted in Figure 2. 

Figure 2. Load Entry and with the arrow button expanded. 
Available operations are also shown.

To get the class record, you need to click 'G' and you will be presented with the Manage Grade interface shown in Figure 3. Student's ID Number and name are blocked for privacy reasons.

Figure 3. Manage Grade Interface for Working with Class Record.

The interface in Figure 3 is a rich interface that will allow you work with your class record in online and provided mechanism for you to work in offline mode. Working with it online was already discussed during the training. This interface is brought up in this discussion because this is the only interface that will allow you to download the CSV file and upload the CSV file containing the class record entries. Figure 3 will display the basic details of all the students enrolled in your subject with the periodic grades and the projected grade. The projected grade is in color green because you can click it to view the details of the student's class record entry.

To start working offline, you have to download the CSV file by clicking the button with the .csv label. Once clicked another view in tab/window will appear in your browser. This view is your CSV file and you need to right click on it and click the "Save As.." option in the pop-up menu that will appear (see Figure 4) and make sure that you save the file with the .csv extention (see Figure 5).
(Note: If download message is Cancelled in Chrome, you have to update your browser.)


Figure 4. Screenshot for saving the CSV file in the PC.


Figure 5. Save the file with the extension .csv
                     

Now that you saved the file into your computer (PC), you can use your favorite spreadsheet program to open it and save it as a file in spreadsheet format (.xls or .odp). Once saved, you can now start encoding your entries. (NOTE:For those using LibreOffice just click OK for each message box that will appear.)

Part 2. Editing and Record Entries.

Now that you have the formatted file saved into your computer (PC), it is time to add entries into it. Please take note that, the contents of the file has already been re-formatted so that the my.Eskwela program can interpret it and make the appropriate actions. So, please do not change any entries that were part of the downloaded file. You start entering your entries at cell C5, you may need to adjust first the length of the cell in column B because in MS Excel 2007 auto-alignment is  not applied unlike in LibreOffice (See Figure 6 and 7.).

Figure 6. Auto-alignment of cell entries in LibreOffice.

Figure 7. No auto-alignment of cell entries in MS Excel 2007.

Once you are comfortable with working the spreadsheet it is now time to add the entries. Rows 5 and 6 has a special meaning in my.Eskwela.

ROW 5. Dash-separated entry that contains the information for Entry's period (Prelim, Midterm Finals), category (Quizzes, assignments, etc..) and the entry name.  An example entry will look like this:

MP-P1

This means that the entry is for midterm period under the project category and the name is P1. You can put whatever entry name you like. So in general, the entries in row 5 will have the form:

PC-Ename

P stands for period and can have the following values:
                                  P                   Prelim
                                  M                  Midterm
                                  F                   Finals

C stands for category and can have the following values:
                                  Q                  Quizzes
                                  A                  Assignments
                                  M                  Major Exams
                                  P                   Project
                                  C                   Recitation
                                  S                   Research
                                  L                   Laboratory

And Ename is the entry name. 

ROW 6. Numeric value that represent the maximum score for that entry.

The following rows will be the score for each student. You do not have to entry the total and the equivalent rating, once the file is uploaded, let my.Eskwela do its job. A sample accomplished entry may look like in Figure 8.


Figure 8. Sample Entries.

Part 3. Converting Back to CSV.

After encoding all the entries into your spreadsheet file and you think it's now time to inform the students of their results, you have to upload the file contents back to my.Eskwela. To do that, you have to convert first your spreadsheet file back to CSV. You can do this by accessing the File --> Save As... command of your favourite spreadsheet program. In LibreOffice it is quite straightforward but in Microsoft Excel 2007 you have to click on Other Formats option (see Figure 9.).

Figure 9. Save As option in MS Excel 2007.


After clicking the Save As option, you will be prompted by the Save As window. You will have to click the Save As type combo box and look for .csv entry (see Figure 10 and 11). Once selected, make sure that the .csv extension is automatically appended at the end of the file name. If not, type .csv at the end of the file name. Then click the Save button. If there are windows asking for confirmation, just click Save in this format and if there are more windows just click OK. And you're done for the conversion.

 Figure 10. Save As window in LibreOffice.

Figure 11. Save As window in MS Excel.


Part 4. Uploading back to my.Eskwela

Uploading the CSV file back to my.Eskwela is very simple, you just have to activate the Manage Grade interface (see Figure 3). And click the Choose File button. With file browser window open select the appropriate CSV file you want to upload. After selecting, your Web Browser may gray out, emphasizing the upload window (see Figure 12). This window will display in percentage the status of the file upload. The response time is dependent on the following factors: class size, number of entries and network connection. It may take some time for the status to move forward. Once the upload is done, the percentage will reach to 100% and a green Done button will appear (See Figure 13).

Figure 12. Showing the upload status.
Figure 13. Upload is done.

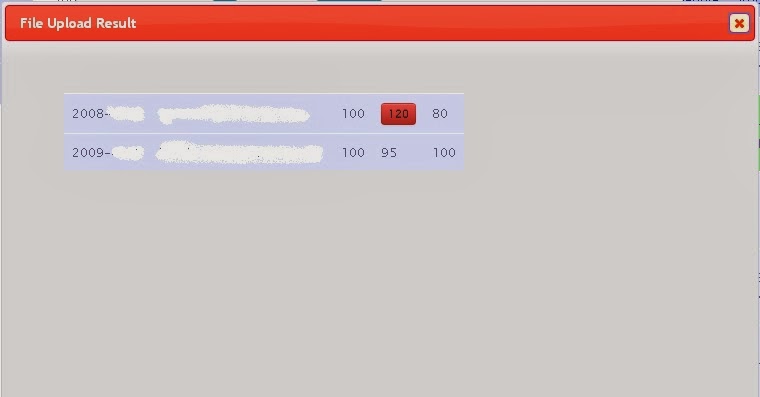
The green Done button will allow you to review the upload status of each entry. To view that status click the Done button and you will be re-directed to another Window called the file upload result. If all the entries are successfully uploaded, you will notice that each entry has no special attribute (see Figure 14). 

Figure 14. File upload result with no errors.

However, typographical errors happens and there might be entries that my.Eskwela program don't understand, so some entries might have some special attributes. This special attribute is represented by a red button labelled with your entry (see Figure 15.)

Figure 15. File upload result with errors.

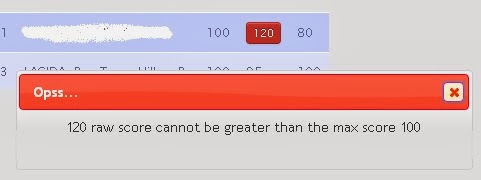
To understand why my.Eskwela does not accept that entry click on that red button and wait for some message to be displayed like in Figure 16.

Figure 16. Sample error message for some entries.

You'll have to look at that entry into your spreadsheet file and repeat Part 3 and Part 4. Or, you may choose to edit that entry in the my.Eskwela's pre-made interface.


Part 5. Fin.
NOTE: If you are having a hard time doing the things described here in this article please send your spreadsheet file to my.eskwela.iit@gmail.com.We will upload the file for you.

Wednesday, August 8, 2012

Collaboration using github

Steps to collaborate an existing project in githhub.

1. Create your account at github.com
2. Give your username to the author of the project.
3. Confirm that you have been added as collaborator in the project.
4. Create your own local git repository.
5. In the local repository, issue the command:

git remote add origin https://github.com//project_name

For example:

git remote add origin https://github.com/breezyrush/my.Eskwela
This will add a reference to a remote repository in github for the project my.Eskwela owned by breezyrush
6. To get all the files already in the remote repository, issue the command:

git pull origin master

This command will copy all the files already in the remote repository to your local repository.
7. After copying you are now free to look at the files change it or add a new file. The thing is -- every changes should be committed to your local repository. After you have done the changes and tested the code yourself and is now ready to share the changes to the collaborator, it's now time to issue the command:

git push origin master

That's it. Now to get updated of other collaborator's changes, you may want to pull from time to time for you to have an updated version in your local repository. Fin.