One of the features of my.Eskwela is that, it does not force you to use it's pre-made interface for encoding grades. But instead, it tries to adopt the way you encode your grades in your favorite spreadsheet program.
Throughout this article, I will be referring to either MS Office Excel or LibreOffice Spreadsheet as your favorite spreadsheet program.
(NOTE: This article assumes that you have the latest version of LibreOffice installed in your computer(PC) and for MS Office Excel the version 2007 is assumed.)
The Cycle
The figure below visually illustrates the flowchart for working with my.Eskwela offline records. The module that allows you to work offline with my.Eskwela is only the Desktop Module. And you can access it using your favorite browser on your Desktop Computer. You can access the Website here.
Briefly, the figure tells us that we need to log in to our my.Eskwela account and access the class record we want to work with later in offline mode, save the class record as a CSV (Comma-Separated Values) file. Open the class record (.csv) file using your favorite spreadsheet program, temporarily save it as xls or odp file, work with it (enter scores, don't forget to save) and convert it back to CSV then upload back to my.Eskwela.
And let my.Eskwela do the magic for computing the grades and presenting it visually to your students.

Figure 1. Working Offline
The Details
Part 1. Downloading the class record and Saving it as a Spreadsheet file.
The brief discussion is easier said than done. Here are the details on how you can get it working. First things first, log in to your account. For those who do not know yet, you will need to provide the username and password in e.SMS desktop application (the one that you use during enrollment, remember?). Once logged in, the teaching loads assigned to you will be displayed on the dashboard. Each load has a corresponding (arrow, '>') button that will allow you to do two things:
- Attendance Recording (button labeled 'A')
- Class Recording (button labeled 'C')
Just like the one depicted in Figure 2.

Figure 2. Load Entry and with the arrow button expanded.
Available operations are also shown.
To get the class record, you need to click 'G' and you will be presented with the Manage Grade interface shown in Figure 3. Student's ID Number and name are blocked for privacy reasons.

Figure 3. Manage Grade Interface for Working with Class Record.
The interface in Figure 3 is a rich interface that will allow you work with your class record in online and provided mechanism for you to work in offline mode. Working with it online was already discussed during the training. This interface is brought up in this discussion because this is the only interface that will allow you to download the CSV file and upload the CSV file containing the class record entries. Figure 3 will display the basic details of all the students enrolled in your subject with the periodic grades and the projected grade. The projected grade is in color green because you can click it to view the details of the student's class record entry.
To start working offline, you have to download the CSV file by clicking the button with the .csv label. Once clicked another view in tab/window will appear in your browser. This view is your CSV file and you need to right click on it and click the "Save As.." option in the pop-up menu that will appear (see Figure 4) and make sure that you save the file with the .csv extention (see Figure 5).
(Note: If download message is Cancelled in Chrome, you have to update your browser.)

Figure 4. Screenshot for saving the CSV file in the PC.

Figure 5. Save the file with the extension .csv
Now that you saved the file into your computer (PC), you can use your favorite spreadsheet program to open it and save it as a file in spreadsheet format (.xls or .odp). Once saved, you can now start encoding your entries. (NOTE:For those using LibreOffice just click OK for each message box that will appear.)
Part 2. Editing and Record Entries.
Now that you have the formatted file saved into your computer (PC), it is time to add entries into it. Please take note that, the contents of the file has already been re-formatted so that the my.Eskwela program can interpret it and make the appropriate actions. So, please do not change any entries that were part of the downloaded file. You start entering your entries at cell C5, you may need to adjust first the length of the cell in column B because in MS Excel 2007 auto-alignment is not applied unlike in LibreOffice (See Figure 6 and 7.).

Figure 6. Auto-alignment of cell entries in LibreOffice.

Figure 7. No auto-alignment of cell entries in MS Excel 2007.
Once you are comfortable with working the spreadsheet it is now time to add the entries. Rows 5 and 6 has a special meaning in my.Eskwela.
ROW 5. Dash-separated entry that contains the information for Entry's period (Prelim, Midterm Finals), category (Quizzes, assignments, etc..) and the entry name. An example entry will look like this:
MP-P1
This means that the entry is for midterm period under the project category and the name is P1. You can put whatever entry name you like. So in general, the entries in row 5 will have the form:
PC-Ename
P stands for period and can have the following values:
P Prelim
M Midterm
F Finals
C stands for category and can have the following values:
Q Quizzes
A Assignments
M Major Exams
P Project
C Recitation
S Research
L Laboratory
And Ename is the entry name.
ROW 6. Numeric value that represent the maximum score for that entry.
The following rows will be the score for each student. You do not have to entry the total and the equivalent rating, once the file is uploaded, let my.Eskwela do its job. A sample accomplished entry may look like in Figure 8.

Figure 8. Sample Entries.
Part 3. Converting Back to CSV.
After encoding all the entries into your spreadsheet file and you think it's now time to inform the students of their results, you have to upload the file contents back to my.Eskwela. To do that, you have to convert first your spreadsheet file back to CSV. You can do this by accessing the File --> Save As... command of your favourite spreadsheet program. In LibreOffice it is quite straightforward but in Microsoft Excel 2007 you have to click on Other Formats option (see Figure 9.).

Figure 9. Save As option in MS Excel 2007.
After clicking the Save As option, you will be prompted by the Save As window. You will have to click the Save As type combo box and look for .csv entry (see Figure 10 and 11). Once selected, make sure that the .csv extension is automatically appended at the end of the file name. If not, type .csv at the end of the file name. Then click the Save button. If there are windows asking for confirmation, just click Save in this format and if there are more windows just click OK. And you're done for the conversion.


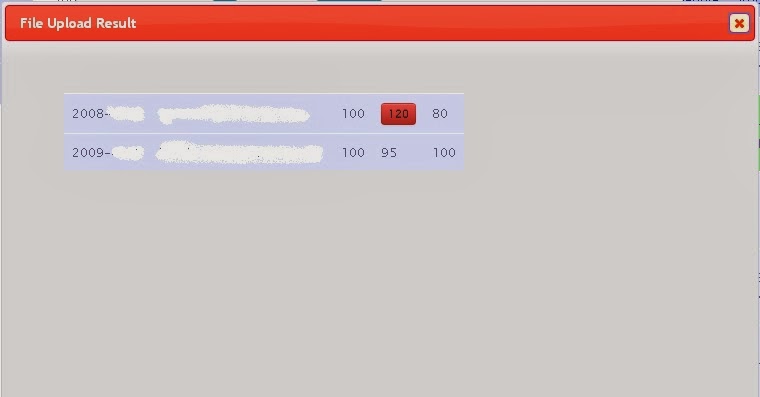
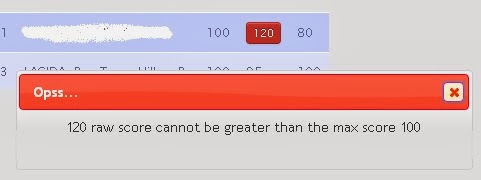
Figure 10. Save As window in LibreOffice.
Figure 11. Save As window in MS Excel.
Part 4. Uploading back to my.Eskwela
Uploading the CSV file back to my.Eskwela is very simple, you just have to activate the Manage Grade interface (see Figure 3). And click the Choose File button. With file browser window open select the appropriate CSV file you want to upload. After selecting, your Web Browser may gray out, emphasizing the upload window (see Figure 12). This window will display in percentage the status of the file upload. The response time is dependent on the following factors: class size, number of entries and network connection. It may take some time for the status to move forward. Once the upload is done, the percentage will reach to 100% and a green Done button will appear (See Figure 13).
Figure 12. Showing the upload status.
Figure 13. Upload is done.
The green Done button will allow you to review the upload status of each entry. To view that status click the Done button and you will be re-directed to another Window called the file upload result. If all the entries are successfully uploaded, you will notice that each entry has no special attribute (see Figure 14).
Figure 14. File upload result with no errors.
However, typographical errors happens and there might be entries that my.Eskwela program don't understand, so some entries might have some special attributes. This special attribute is represented by a red button labelled with your entry (see Figure 15.)
Figure 15. File upload result with errors.
To understand why my.Eskwela does not accept that entry click on that red button and wait for some message to be displayed like in Figure 16.
Figure 16. Sample error message for some entries.
You'll have to look at that entry into your spreadsheet file and repeat Part 3 and Part 4. Or, you may choose to edit that entry in the my.Eskwela's pre-made interface.
Part 5. Fin.
NOTE: If you are having a hard time doing the things described here in this article please send your spreadsheet file to my.eskwela.iit@gmail.com.We will upload the file for you.